Have you ever trekked out to a faraway place with incredibly dark skies in hopes of capturing some great photos, only to realize that you made a critical error in forecasting the sky conditions?
I have, and after that night I started looking for a way to ensure that I never made that mistake again. I’ve used quite a few different forecasting apps but there is one that I always keep coming back to, and use almost exclusively.
The one I’m referring to is Astrospheric, which is an astronomy forecasting tool that covers everything you need to know when planning an imaging session.
In this post I am going to show you how to use Astrospheric and explain what each of the different indicators mean.
They are each important in their own way, and understanding them is going to help ensure that you don’t end up packing up your gear and heading home empty handed.

Table of Contents
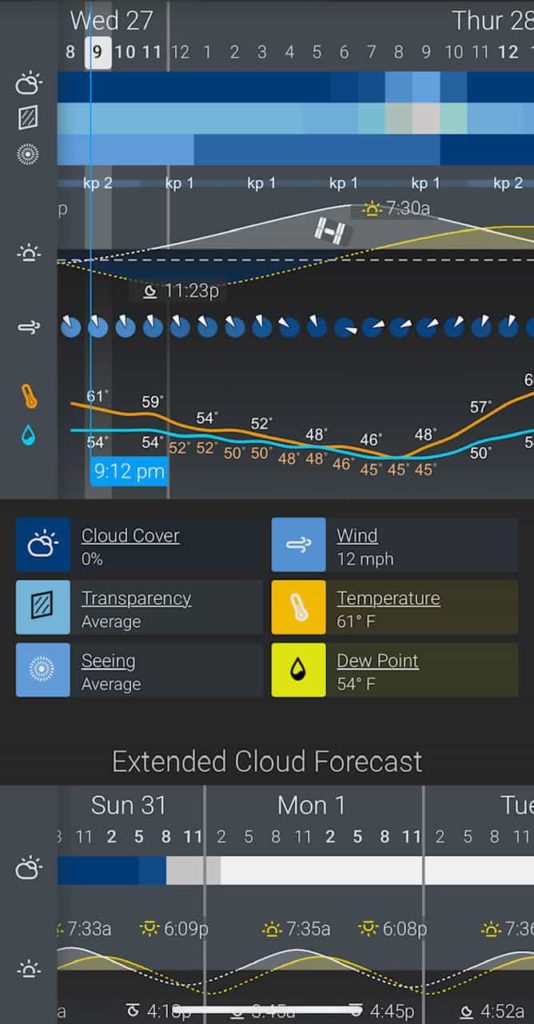
Cloud cover
It’s no secret that you can’t very well image the night sky when it’s covered with clouds.
Astrospheric’s definition for this forecast is “the percentage of the sky that is obscured by clouds”. You ideally want this number to be low but sometimes nights with zero cloud cover never come around depending on where you live.
If there are clouds in the sky, you need to be prepared for them to potentially drift through some of your sub exposures. I find this forecast to be quite accurate based on my personal experience using it.
However, on rare occasions I have seen it say 5% cloud cover and either the forecast was wrong, or that particular part of the sky was directly over my house. No forecasting tool is 100% accurate, but this one has worked the best for me.
Transparency
This is a measure of what you can see in the night sky with the naked eye.
If haze, smoke, or light pollution are present, this forecast will reflect that. Imaging through smoke or haze will affect your sub exposures and can make the brighter stars and the background of your image blotchy.
This can be very difficult or impossible to correct in post processing. If the transparency is poor, it’s usually a good idea to wait until it improves.
Seeing
Seeing and transparency sound similar but they are not the same thing, and seeing is also not the same thing as visibility.
Seeing is a gauge of the turbulence in the earth’s atmosphere and when its bad you will notice stars visibly twinkling.
This can majorly impact your ability to guide as your guiding software will have a very difficult time monitoring the guide stars. Even if there are no clouds in the sky, the seeing can be poor and it may not be noticeable unless you check the forecast.
For more information guiding and guiding error, please refer to “What’s a good RMS guiding error in PHD2?”
Moon Elevation
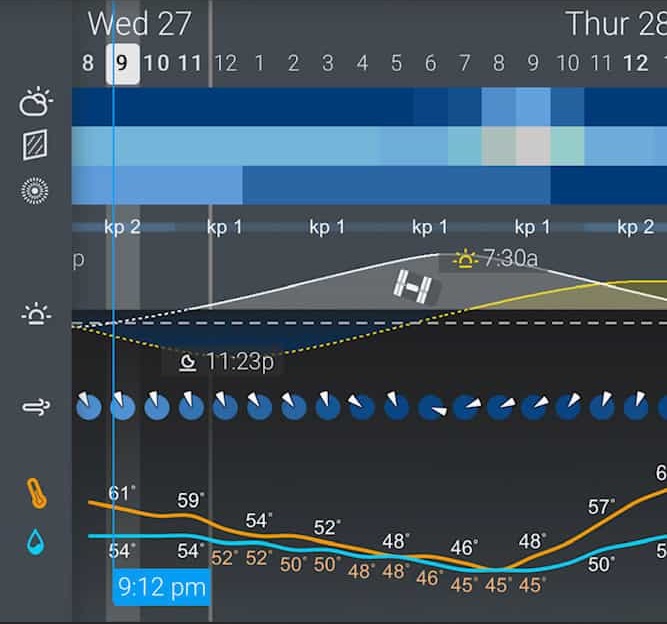
The white line on this graph is the elevation of the moon hour by hour.
At the peak the moon is at it’s highest point in the sky and when this line becomes dotted, you know that the moon is below the horizon.
You will want to take both this and the phase of the moon in to consideration for whether or not you want to image, especially if you are imaging in broadband vs narrowband.
If you are going to image while the moon is out, try to make sure it’s 30 degrees or more away from your target.
Wind
This may not be extremely obvious but even a small amount of wind can also impair your ability to guide, especially if you are using a large telescope with a lot of surface area.
If the forecast shows wind, try to set up your equipment in an area with protection from it if possible. I would also click on each hour individually and check to see what the forecast says.
Just because it’s not windy when you set up doesn’t mean it won’t be windy 4 hours later. My personal rule of thumb is that if the wind is blowing more than 8 or 9 mph, I don’t image that night. I use a small 70mm refractor so your mileage may vary.
Dew point
There are two colored lines on this graph, one is blue and the other is orange. The orange line is temperature and the blue line is the dew point.
Pay close attention to these two lines, because when they intersect with each other you will start noticing condensation on whatever you leave outside. That also includes your imaging computer if you are using one, so keep that in mind and try to keep it covered.
This isn’t an issue if you have dew heaters, just note that you will want one for your main optics and also your guide scope.
If you don’t pay close attention to this forecast and those lines meet one another, I can promise your lens will eventually dew up unless you use dew heaters.
Lens dew can entirely obstruct your view of the target and is basically impossible to image through. If you have never experienced it, you might even think something is wrong with your equipment when you later look at your subs.
Moon Phase
Going back to my intro statement, this is what I forgot to check before making a long drive out to a dark site.
I remember getting out of my car thinking that the site didn’t look any darker than it did at home. When I turned back around, I noticed that the full moon was literally casting a shadow of myself on the ground behind me.
The amount of light a full moon produces can be the equivalent of several increases on the Bortle scale. It can completely wash out almost all of the stars in the sky, and will do the same thing to the target that you plan on imaging.
I’ve learned the hard way to not underestimate the wrath of the moon, and now reserve nights with a bright moon for narrowband imaging.
If you are wondering if it’s worth making a drive out to a dark site on a night with a full moon, the answer is no.
Extended Cloud Forecast
This is fairly self-explanatory but less accurate than the daily forecast.
It’s always nice to see a stretch of clear skies in the forecast for several consecutive days, and it’s fantastic when its correct. I would take this with a grain of salt though because this forecast can change at the drop of a hat.
If you would like to leave your equipment set up and you aren’t sure what the conditions will be like in the days to come, look in to the Telegizmos 365 cover. I have one myself and some people leave their equipment set up year-round with these covers.
Map Layer
This is a really cool feature of Astrospheric. This allows you to click a play button and gives you a visual forecast hour by hour. Using this feature will allow you to see if conditions are likely to improve or worsen. After you click the map layer button, you will get a drop-down menu of different options to choose from. These options include:
- Smoke
- Cloud
- Transparency
- Seeing
- Temperature
- Jet Stream
- Infrared Satellite
- Light Pollution
Conclusion
There are a lot of forecasting apps available but Astrospheric continues to be my favorite. It’s a free, well-rounded tool with indicators that tell you everything you need to know about the sky conditions.
Understanding them will allow you to make an informed decision on whether or not you want to image on a particular night, or at least prepare you for some of the challenges you may face.
Astrophotography is a challenging hobby, and sometimes nights of imaging are ruined by things that are simply out of your control. Failure to look at the sky forecast is not one of those things.
For the past couple of years, Astrospheric has been my go-to astronomy forecasting app. If used correctly, it can certainly help you avoid any unwanted surprises on nights where you have an otherwise well-planned out imaging session.


2 thoughts on “Astrospheric – The Best Free Astronomy App”
Comments are closed.